Wednesday, January 30, 2019

Understanding and working with NULL in SQL Server

Graphic representation of the difference between 0 and NULL
Image taken from 9gag.com
According to database theory, a good RDBMS must implement a marker to indicate "Missing or inapplicable information".

SQL Server implements the lack of value with NULL, that is datatype independent and indicates missing value, so the logical validations are different, this is better known as Three-Valued Logic, where any predicate can evaluate to True, False or Unknown.

I see a common error, referring to null like "Null values" but the correct definition of null is "Lack of value" so you must refer to it as null, in singular form.

On this post, we will learn how to work with null in SQL Server.

Declaring and assigning NULL


For working with null, SQL Server engine uses the reserved word NULL to refer to it.
It is datatype independent so you just have to assign it to any variable or field, using the equal operator =, as you can see on this example:

DECLARE @NVi as int = NULL;
DECLARE @NVc as nvarchar(30) = NULL;
DECLARE @NVv as sql_variant = NULL;

SELECT @NVi, @NVc, @NVv;

If we run the statement, we will obtain these results, the same for each data type, as expected.


For inserting and updating fields with NULL we do it like on this example:


-- For inserting values
INSERT INTO test1..Table_1 (column_char,column2)
VALUES(NULL, NULL);

-- For updating values
UPDATE test1..Table_1
SET column2 = NULL;

Be careful when working with null, the equal operator = is only used for assignment.

Operations and comparison against NULL


As we stated earlier, any predicate or comparison can evaluate to TRUE, FALSE or UNKNOWN, so when a value is unknown we don't know if it is true or false, so comparing or working any value with unknown is also unknown.

For example, the following operations result is NULL in all cases:

--Arithmetic operations
SELECT NULL+5,NULL-3.47, NULL*3.1416, NULL/0; 

SELECT SQRT(NULL), POWER(NULL,2);

--String operations
SELECT 'HELLO ' +NULL + 'WORLD';

SELECT QUOTENAME(NULL);

SELECT LTRIM(NULL);

--Date operations

SELECT DATEADD(m,1,NULL);

SELECT DATEDIFF(m,GETDATE(),NULL);

When comparing to null, we also obtain null as well, as in those examples, as you can see, even comparing null to null is unknown, and when we execute below code, we obtain NO for all:


--comparing to 0
IF(0= NULL) OR (0 <> NULL)
 SELECT 'YES'
ELSE
 SELECT 'NO' 

--Comparing to empty string ''
IF(''= NULL) OR (''<> NULL)
 SELECT 'YES'
ELSE
 SELECT 'NO' 

--Even comparing to another null
IF(NULL= NULL) OR (NULL<> NULL)
 SELECT 'YES'
ELSE
 SELECT 'NO' 

So, if we want to compare value or column and check if is null or not what must we do?
SQL Server implements the IS NULL and IS NOT  NULL to compare against null, usage is as follows:


-- IS NULL usage

SELECT *
FROM test1..Table_1
WHERE column2 IS NULL;


-- IS NOT NULL usage

SELECT *
FROM test1..Table_1
WHERE column_char IS NOT NULL;


-- Using on IF construct

DECLARE @NVi as int = NULL;

IF(@NVi IS NULL)
 SELECT 'YES'
ELSE
 SELECT 'NO';


-- For Replacing NULL you can use
-- ISNULL Value since SQL 2008

SELECT ISNULL(@NVi,0);


With these tools we are ready to work with null in our databases, so now you should follow some considerations to not impact your database performance.

Special considerations for good performance


As the last point, I would like to give you some tips for dealing with NULL

Prefer IS NULL over ISNULL()


When possible, try to compare predicates using IS NULL, before casting NULL to default values using ISNULL(), because casted values are not SARGABLE.

Take as an example of these two queries, they are equivalent, but the first one has better performance over the second:


-- First query uses an index seek :)
SELECT FirstName
      ,MiddleName
      ,LastName     
FROM Person.Person
WHERE MiddleName = N'' 
 OR MiddleName IS NULL;

-- Second query uses an index scan :(
SELECT FirstName
      ,MiddleName
      ,LastName     
FROM Person.Person
WHERE ISNULL(MiddleName,N'')=N'';

These are the execution plans:

First query execution plan, an index seek is used :)

Second query execution plan, an index scan is used :(

We get a warning on the second execution plan
You can see the 2 differences on the 2 plans, so for this case, we prefer to stick to the first one, even if you must write more code.

Be careful with aggregations over nonexistent data


When you perform aggregations, be extra careful with no existent data, even when columns do not allow null, aggregate data that does not exist on the table returns null, contrary to what one could think can be the usual (a 0 value), as you can see on this example:


-- Even when TotalDue field does not allow NULL, 
-- the SUM of noexistent values is NUll, not 0 as one could think

SELECT SUM(TotalDue) as [Total Due]
FROM Sales.SalesOrderHeader
WHERE DueDate > GETDATE();

And the query results:


For those cases, you should use the ISNULL() function after SUM.

As I always recommend: test anything before going live, and use default values and not null columns when possible, to make your life easier.


Monday, January 21, 2019

MSSQLTips.com Rookie of the year 2018

You need a lot of hard work for success!
2018 was a good year for me in a lot of areas of my life both personal and professional (the birth of my daughter, my MCSE certification and another MCSA as well, the start of the local PASS Local group, the growth and recognition of this blog, etc).

Also, since August 2018, I started writing technical posts for other sites, and one of them is MSSQLTips.com. This is one of the best SQL Server related sites on the world, it contains a lot of technical articles in a "tip" format where you can learn new things or how to fix an issue in your environments.

The new year 2019 has come and new opportunities to continue growing, to continue learning and improve your career. I also have started this year with good news, last week I was awarded "Rookie of the year 2018" by MSSQLTips. This award is won by community, peer and site leaders votes, so I am very honored that many people have voted for me, this is a great honor and a big responsibility at the same time, I cannot put my guard down, so many people have been giving me their vote so I have to continue with the hard work learning and providing high-quality content, not just on that site, but all the sites I write.

I hope to continue writing and be able to be nominated for author of the year 2019, as some of you know, the most difficult part of writing is to find good topics to write about, but I want to focus on things I have difficulties when I started working with SQL Server, so new people starting with databases can have more handy and easy to follow material to get started.

I also want to congratulate my friends Pablo Echeverria and Alejandro Cobar for being also nominated on the site, we have a lot of potential here in Guatemala.

If you are interested, you can see the award here:
https://www.mssqltips.com/sqlservertip/5883/mssqltipscom-author-and-rookie-of-2018/

Wednesday, January 9, 2019

Source Control using Azure Data Studio and GitHub

You can maintain and deploy code easily
Source control is a vital part of IT work, since it is used to track changes over software and documents, with two main benefits: having a centralized, up to date copy of all your applications and utilities, and to be able to rollback to a previous stable version in case of a failed deployment.

This is perfectly applicable to SQL Server, where you want to have an updated and ready to deploy elsewhere copy of your database objects.

There are a lot of source control applications and software, everyone has its pros and cons, but personally, I like to use GitHub, since it is free to use and since it was recently acquired by Microsoft, support for other products is easier (SQL Server for this case).

On this post, I will show you how to implement a source control for a database using GitHub and Azure Data Studio (ADS).

Setting up your machine


First of all, you need to have Azure Data Studio installed and running on your machine, and also a GitHub account to be able to upload and maintain your files.

You will need Git to be able to use source control features in ADS, you can download from here. After downloading it, proceed to install it on your local machine (default features are ok).

To verify Git is installed correctly, just open any command prompt and type git then press enter:


Configuring Azure Data Studio


To be able to use source control on ADS, we have to perform some simple steps:

Open ADS and click on File>Open Folder, locate the folder you want for work and click OK (can be an empty folder for now).
For this example, I am using C:\Repos\SourceControlDB


You can see that now the selected folder appears on the top bar


Once a folder is selected, click on Source Control, located on the left bar


Click on Initialize Repository


And that is all, you are ready to work with source control.


Working with Git

Adding a file to source control


Now we will add an object to our Git folder to see how sourcing works.
Open any already created database object or a TSQL query on ADS IDE


Save it on your Git Folder with a meaningful name


Once saved, you can see the file is added to the source control as an untracked change


Just select the changes you want to commit (in case you have more open files) and then click on Commit on the upper right corner of the source control area


Since the changes have not been staged, a message box asking to do it automatically, click on Yes


Provide a meaningful commit message and press Enter


Now the file has been added to source control successfully.

Editing the file


We now proceed to do a simple change in the stored procedure


At the moment you save the file, you can notice that a new change is added to source control and modified or added lines are marked on the file


If you click on the change, you can now see the actual changes made to the file


If you are Ok with the changes, commit them using the same option as earlier, and that is the basic Git usage.


We will cover the rollback, merge and some other features on the next post.

Now we will learn how to upload your local Git files to GitHub.


Linking your repository to GitHub the first time


The easiest way is using your GitHub profile, so let's do it...

Create a new repository on your profile with the options you want, and click on Create Repository


In the next step copy the code for pushing an existing Git repository


Open a new command prompt, navigate to your Git folder and paste the code there, one line at a time


In my case for the first line, the origin already exists so it will throw an error, but for your first time it will execute ok, for the second line, after a few moments it will ask you for username and password


After a few moments (depending on your folder size) files will be uploaded and now your repository is uploaded to GitHub successfully (as long with all the versions you have)


You have successfully linked your Git folder with GitHub, as you can see the file is uploaded


Your GitHub is now linked


Since we have done the linking, you can upgrade existing or add new files and they will be uploaded to GitHub when you commit the changes and sync them.

We perform another quick change to our file and commit it


Then we click on Sync to synchronize with GitHub


After the process ends, if you check your GitHub repository you can see the new change


Now you have configured your environment to support source control directly to GitHub. On the next post, we will see some other advanced options, like perform the sync automatically.
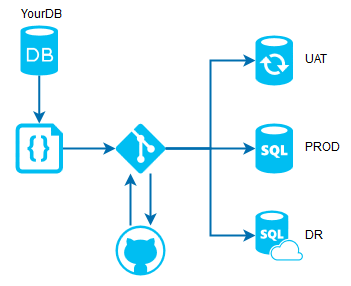
Also, we will learn how to pull those files from another place and apply them to other SQL Server instance.

Monday, November 12, 2018

Load and run custom T-SQL scripts in SSMS via Snippets

If you work with SQL Server on a daily basis, it is very likely you have a lot of custom scripts you have to execute frequently, maybe you have stored them on a folder and you open them manually as you need them, or have saved them on a solution or project file, maybe you execute a custom .bat or PowerShell file to load them when you open SSMS...

Every method has its pros and cons, and on this post, I will show you a new method to load your custom scripts on any open query window on SSMS via Snippets.

What is a Snippet?


According to Microsoft Documentation:
Code snippets are small blocks of reusable code that can be inserted in a code file using a context menu command or a combination of hotkeys. They typically contain commonly-used code blocks such as try-finally or if-else blocks, but they can be used to insert entire classes or methods.

In short words is custom code (T-SQL Scripts for us) that you use a lot and you want to have always available to use.
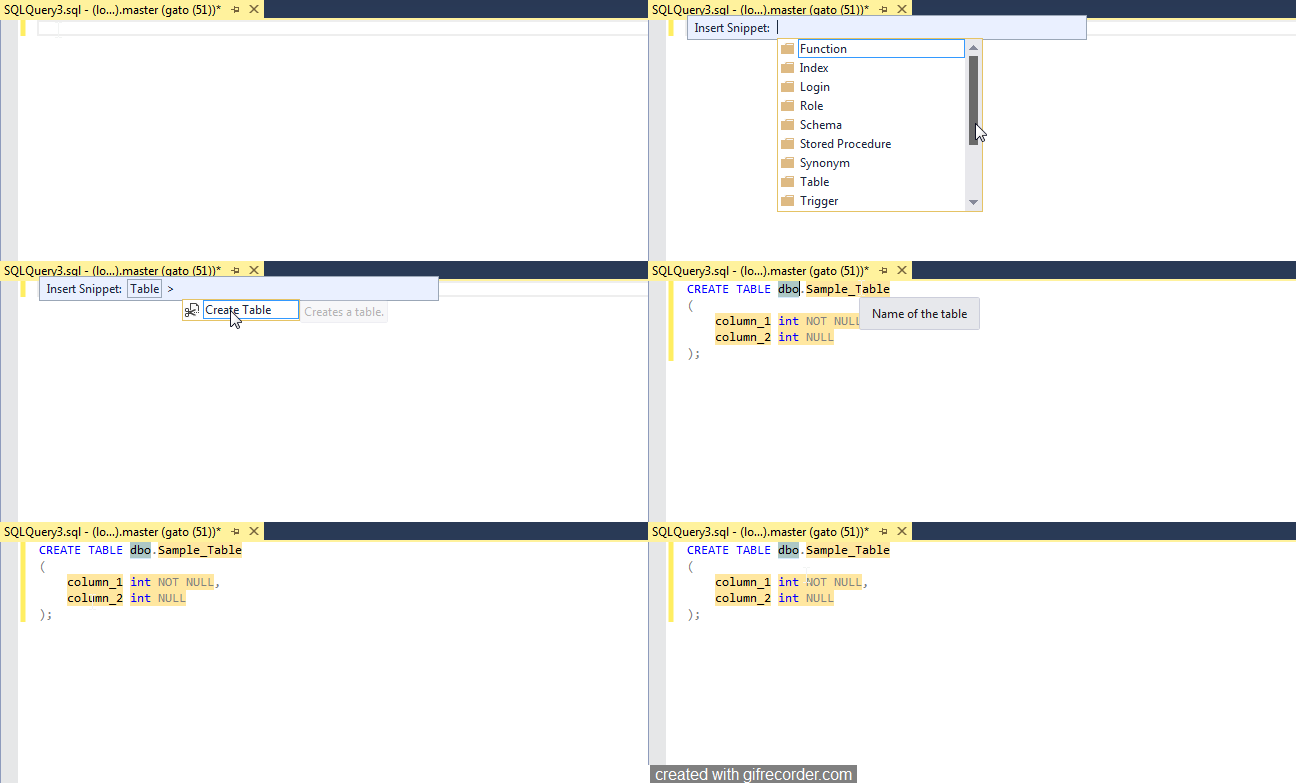
In SSMS there are a lot of code snippets available by default, that you can use right away, let us see one of them in action, we will use a snippet to insert a create table template:


You can see how easy is to load the code in any existing window, even if this already has code on it, so now let us create one with our custom code.


Creating a custom Snippet


These files are stored in XML format with a .snippet extension, you can find the official documentation here.

The basic template is this (you can find the file on my GitHub):


<?xml version="1.0" encoding="utf-8" ?>
<CodeSnippets xmlns="http://schemas.microsoft.com/VisualStudio/2005/CodeSnippet">
 <CodeSnippet Format="1.0.0">
 <Header>
 <Title>Your Snippet title</Title>
        <Shortcut></Shortcut>
 <Description>Your snippet description</Description>
 <Author>Author of the snippet</Author>
 <SnippetTypes>
  <SnippetType>Expansion</SnippetType>
 </SnippetTypes>
 </Header>
 <Snippet>
  <Declarations>
   <Literal>
    <ID>Variable1</ID>
    <ToolTip>Variable1 description</ToolTip>
    <Default>variable1 default value</Default>
   </Literal>
  </Declarations>
  <Code Language="SQL">
<![CDATA[
SELECT $Variable1$
]]>
  </Code>
 </Snippet>
 </CodeSnippet>
</CodeSnippets>

Explaining it:

  • You need to insert your custom code inside the <![CDATA[]]> label. 
  • If you have variables, you must enclose them in $ characters ($Variable1$ for our template, and then declaring the variable with the name you use inside the <Declarations> section.
  • Then declare the Script name, description, and author in the <Header> section.
  • Save it with the .snippet extension.
I have a simple script that I use a lot to see the elapsed and remaining time for any session on SQL server, so let us use it for this example, the query is the following (Note: I didn't make this script, but I was not able to find the author, so if you know him/her, please let me know so I can give the proper credit):


SELECT 
 r.session_id,
 r.command,
 CONVERT(NUMERIC(6,2),r.percent_complete) AS [Percent Complete],
 CONVERT(VARCHAR(20),DATEADD(ms,r.estimated_completion_time,GetDate()),20) AS [ETA Completion Time],
 CONVERT(NUMERIC(10,2),r.total_elapsed_time/1000.0/60.0) AS [Elapsed Min],
 CONVERT(NUMERIC(10,2),r.estimated_completion_time/1000.0/60.0) AS [ETA Min],
 CONVERT(NUMERIC(10,2),r.estimated_completion_time/1000.0/60.0/60.0) AS [ETA Hours],
 CONVERT(VARCHAR(1000),(SELECT SUBSTRING(text,r.statement_start_offset/2,
 CASE WHEN r.statement_end_offset = -1 
 THEN 1000 ELSE (r.statement_end_offset-r.statement_start_offset)/2 END)
FROM sys.dm_exec_sql_text(sql_handle)))AS [SQL Text]
FROM sys.dm_exec_requests r WHERE command LIKE  '%%' --Text of the Session you want to monitor, like BACKUP or DBCC


For this script, our variable will be the text in the like statement, so after using the snippet template, our code should look like this:

<?xml version="1.0" encoding="utf-8" ?>
<CodeSnippets xmlns="http://schemas.microsoft.com/VisualStudio/2005/CodeSnippet">
 <CodeSnippet Format="1.0.0">
 <Header>
 <Title>Running Queries ETA</Title>
        <Shortcut></Shortcut>
 <Description>Display estimated completed time for any given query</Description>
 <Author>SQLGuatemala.com</Author>
 <SnippetTypes>
  <SnippetType>Expansion</SnippetType>
 </SnippetTypes>
 </Header>
 <Snippet>
  <Declarations>
   <Literal>
    <ID>YourCommand</ID>
    <ToolTip>Command to look for</ToolTip>
    <Default>BACKUP</Default>
   </Literal>
  </Declarations>
  <Code Language="SQL">
   <![CDATA[
SELECT 
 r.session_id,
 r.command,
 CONVERT(NUMERIC(6,2),r.percent_complete) AS [Percent Complete],
 CONVERT(VARCHAR(20),DATEADD(ms,r.estimated_completion_time,GetDate()),20) AS [ETA Completion Time],
 CONVERT(NUMERIC(10,2),r.total_elapsed_time/1000.0/60.0) AS [Elapsed Min],
 CONVERT(NUMERIC(10,2),r.estimated_completion_time/1000.0/60.0) AS [ETA Min],
 CONVERT(NUMERIC(10,2),r.estimated_completion_time/1000.0/60.0/60.0) AS [ETA Hours],
 CONVERT(VARCHAR(1000),(SELECT SUBSTRING(text,r.statement_start_offset/2,
 CASE WHEN r.statement_end_offset = -1 
 THEN 1000 ELSE (r.statement_end_offset-r.statement_start_offset)/2 END)
FROM sys.dm_exec_sql_text(sql_handle)))AS [SQL Text]
FROM sys.dm_exec_requests r WHERE command LIKE  '%$YourCommand$%'
]]>
  </Code>
 </Snippet>
 </CodeSnippet>
</CodeSnippets>


We save it with the .snippet extension to a folder in our computer, the next step is to load it to SSMS.


Loading the Snippet into SSMS


Open SSMS and go to Tools> Code Snippets Manager


The following window will open. If you want to load a complete snippet folder, click on Add, or if you want to load just one snippet, click on Import.


For this example we will load the entire folder where we store the snippet template and the one we created in the previous step, so we click on Add, and then locate the snippet folder:


We can see that the custom Snippets folder has been created and the 2 snippets are loaded.


After that, we can use the custom code snippets on any window we want.

Loading our Custom Snippet


Now you can load your custom code in any SSMS open query window, we will use it to know how much time is taking a DBCC command we are running on the other window:


For more information on T-SQL snippets, visit this link.

Thursday, November 8, 2018

Enable Machine Learning Services on SQL Server

R Services (SQL Server 2016) or Machine Learning Services (2017 and 2019 CTP) provide you with the ability to perform data analysis from the database itself using T-SQL.

You can learn a little more about what you can do in the SQL Server blog.

On this post, I will show you how to setup and configure it so you can start using it right away in your applications and reports.

To install it

You have to choose it from instance features on your SQL server setup window, you then choose the languages you want to work (R, Python)


Note: if your computer does not have access to the internet, you will have to download two packages separately and then locate them in the setup window.

Continue the setup as usual and finish it.

After you run the setup, please make sure that SQL Server LauchPad service is running for the instance you have installed the Machine Learning Services.


I recommend you to patch the instance with the latest update available in case you encounter any issue with the service startup.


To configure it


Just connect to the instance where the Machine Learning Services was added, using your favorite tool, and run the following T-SQL to enable the code execution:


EXEC sp_configure  'external scripts enabled', 1
RECONFIGURE WITH OVERRIDE

You must see the following output:


After that, you have to restart the SQL Server service for it to work.

our last step is just to test it...


Testing the script execution


To execute scripts you must use the sp_execute_external_script procedure, you can find the official documentation here.

This is the most basic command I can think you can execute to see if everything is ok, displaying the license information of the R language:


EXEC sp_execute_external_script  
@language =N'R',
@script= N'license()'

Note that the first execution after a service restart will take some time to complete, but after waiting you should see the license information in the Messages window:


And now... a simple example with real data


For this example, we will take Application.Countries table from WideWorldImporters test database and display it sorted by population in descendent order with an R script, running this T-SQL:


USE WideWorldImporters
GO


EXEC sp_execute_external_script  @language =N'R',
@script=N'
dsTest<- InputDataSet
OutputDataSet <- dsTest[order(-dsTest$LatestRecordedPopulation),]
',
@input_data_1 =N'
SELECT 
 CountryName,
 FormalName,
 LatestRecordedPopulation,
 Continent
FROM [Application].[Countries]
WHERE Region = ''Americas'''
WITH RESULT SETS 
 (
  ( 
  [CountryName] [nvarchar](60) NOT NULL,
  [FormalName] [nvarchar](60) NOT NULL,
  [LatestRecordedPopulation] [bigint] NULL,
  [Continent] [nvarchar](30) NOT NULL
  )
 );
GO


If you have the database installed and run it, you can see the output with the data sorted from the R script:


You have learned how to execute simple R scripts against SQL server tables from the database engine, so now you can make more complex examples and do your own data analysis scripts.

For more in-depth information visit this link.

Monday, October 15, 2018

How much affects encryption to your database performance?

Transparent data encryption (TDE) helps you to secure your data at rest, this means the data files and related backups are encrypted, securing your data in case your media is stolen.
This technology works by implementing real-time I/O encryption and decryption, so this implementation is transparent for your applications and users.

However, this type of implementation could lead to some performance degradation since more resources must be allocated in order to perform the encrypt/decrypt operations.

On this post we will compare how much longer take some of the most common DB operations, so in case you are planning to implement it on your database, you can have an idea on what to expect from different operations.

Setup of our example


For this example we will use the Wide World Importers sample database, and restore it 2 times, one decrypted, and the other one encrypted. Please note that the restored database is around 3.2 GB size, a relatively small one.

To encrypt one of the databases we use the following T-SQL (more info about how TDE works here):

USE master;
GO


CREATE MASTER KEY ENCRYPTION BY PASSWORD = 'Y0uR_P@$$worD_123';
GO


CREATE CERTIFICATE MyServerCert
	WITH SUBJECT = 'WWI Encryption';
GO


USE [WideWorldImporters_encrypted];
GO


CREATE DATABASE ENCRYPTION KEY
	WITH ALGORITHM = AES_128 ENCRYPTION BY SERVER CERTIFICATE MyServerCert;
GO


ALTER DATABASE [WideWorldImporters_encrypted]


SET ENCRYPTION ON;
GO


After the above T-SQL has been executed, now we have the 2 databases ready for our example:


So it is just a matter of testing and measuring different operations and compare them (in no particular order):

DBCC CHECKDB


We run a dbcc checkdb on each database with the following T-SQL:

SET STATISTICS TIME ON;

DBCC CHECKDB([WideWorldImporters]) WITH NO_INFOMSGS

DBCC CHECKDB([WideWorldImporters_encrypted]) WITH NO_INFOMSGS

SET STATISTICS TIME OFF;

we can see the results, it took around 6% more to complete:


BACKUP DATABASE


Before we start this one, read this post about issues found on database backups with TDE enabled, so it is strongly recommended to patch your instances before using it.

SET STATISTICS TIME ON;

BACKUP DATABASE [WideWorldImporters] TO  
DISK = N'D:\DBAWork\WideWorldImporters-Full.bak' 
WITH NOFORMAT, NOINIT,  NAME = N'WideWorldImporters-Full', 
SKIP, NOREWIND, NOUNLOAD, COMPRESSION,  STATS = 100

BACKUP DATABASE [WideWorldImporters_encrypted] TO  
DISK = N'D:\DBAWork\WideWorldImporters_encrypted-Full.bak' 
WITH NOFORMAT, NOINIT,  NAME = N'WideWorldImporters_encrypted-Full', 
SKIP, NOREWIND, NOUNLOAD, COMPRESSION,  STATS = 100

SET STATISTICS TIME OFF;

Surprisingly, this one took less time with encryption enabled, around 15% less time... but wait! this is because of the number of pages processed by each backup operation, because if you check the average speed, you can see the encrypted backup operation is in fact, slower (around 33%), so in the case of this operation, it can vary for your environment:


Restore Database


If you plan to restore an encrypted database to a different server, remember that you must back up your master key and certificate and restore it on the new server in order to do it, otherwise you will not able to recover encrypted data.
Since now we are on the same instance, master key and certificate are already there, so we just run the simple RESTORE command:

SET STATISTICS TIME ON;

USE [master]
RESTORE DATABASE [WideWorldImporters] FROM  
DISK = N'D:\DBAWork\WideWorldImporters-Full.bak' 
WITH  FILE = 1,  NOUNLOAD,  REPLACE,  STATS = 100

RESTORE DATABASE [WideWorldImporters_encrypted] FROM  
DISK = N'D:\DBAWork\WideWorldImporters_encrypted-Full.bak' 
WITH  FILE = 1,  NOUNLOAD,  REPLACE,  STATS = 100

SET STATISTICS TIME OFF;

As with the backup operation, the restore took less time for the encrypted database, but you can see that is because of the number of pages processed, because if you check the average restore speed, for the encrypted database is slower (167% slower), so also check this one for your own databases:


Rebuild indexes


We execute Rebuild index statements for random tables with the following T-SQL:

SET STATISTICS TIME ON;

USE [WideWorldImporters]
GO

Print '--- Normal DB ---'

ALTER INDEX [CCX_Warehouse_StockItemTransactions] ON [Warehouse].[StockItemTransactions] 
REBUILD PARTITION = ALL WITH (DATA_COMPRESSION = COLUMNSTORE)

ALTER INDEX [IX_Sales_OrderLines_Perf_20160301_01] ON [Sales].[OrderLines] 
REBUILD PARTITION = ALL 
WITH (PAD_INDEX = OFF, STATISTICS_NORECOMPUTE = OFF, SORT_IN_TEMPDB = OFF, 
RESUMABLE = OFF, ONLINE = OFF, ALLOW_ROW_LOCKS = ON, ALLOW_PAGE_LOCKS = ON)

ALTER INDEX [UQ_Warehouse_StockItems_StockItemName] ON [Warehouse].[StockItems] 
REBUILD PARTITION = ALL 
WITH (PAD_INDEX = OFF, STATISTICS_NORECOMPUTE = OFF, SORT_IN_TEMPDB = OFF, 
RESUMABLE = OFF, ONLINE = OFF, ALLOW_ROW_LOCKS = ON, ALLOW_PAGE_LOCKS = ON)

ALTER INDEX [PK_Application_People] ON [Application].[People] 
REBUILD PARTITION = ALL 
WITH (PAD_INDEX = OFF, STATISTICS_NORECOMPUTE = OFF, SORT_IN_TEMPDB = OFF, 
RESUMABLE = OFF, ONLINE = OFF, ALLOW_ROW_LOCKS = ON, ALLOW_PAGE_LOCKS = ON)

ALTER INDEX [FK_Purchasing_PurchaseOrderLines_StockItemID] ON [Purchasing].[PurchaseOrderLines] 
REBUILD PARTITION = ALL 
WITH (PAD_INDEX = OFF, STATISTICS_NORECOMPUTE = OFF, SORT_IN_TEMPDB = OFF, 
RESUMABLE = OFF, ONLINE = OFF, ALLOW_ROW_LOCKS = ON, ALLOW_PAGE_LOCKS = ON)

Print '--- END Normal DB ---'

USE [WideWorldImporters_encrypted]
GO

Print '--- Encrypted DB ---'


ALTER INDEX [CCX_Warehouse_StockItemTransactions] ON [Warehouse].[StockItemTransactions] 
REBUILD PARTITION = ALL WITH (DATA_COMPRESSION = COLUMNSTORE)

ALTER INDEX [IX_Sales_OrderLines_Perf_20160301_01] ON [Sales].[OrderLines] 
REBUILD PARTITION = ALL 
WITH (PAD_INDEX = OFF, STATISTICS_NORECOMPUTE = OFF, SORT_IN_TEMPDB = OFF, 
RESUMABLE = OFF, ONLINE = OFF, ALLOW_ROW_LOCKS = ON, ALLOW_PAGE_LOCKS = ON)

ALTER INDEX [UQ_Warehouse_StockItems_StockItemName] ON [Warehouse].[StockItems] 
REBUILD PARTITION = ALL 
WITH (PAD_INDEX = OFF, STATISTICS_NORECOMPUTE = OFF, SORT_IN_TEMPDB = OFF, 
RESUMABLE = OFF, ONLINE = OFF, ALLOW_ROW_LOCKS = ON, ALLOW_PAGE_LOCKS = ON)

ALTER INDEX [PK_Application_People] ON [Application].[People] 
REBUILD PARTITION = ALL 
WITH (PAD_INDEX = OFF, STATISTICS_NORECOMPUTE = OFF, SORT_IN_TEMPDB = OFF, 
RESUMABLE = OFF, ONLINE = OFF, ALLOW_ROW_LOCKS = ON, ALLOW_PAGE_LOCKS = ON)

ALTER INDEX [FK_Purchasing_PurchaseOrderLines_StockItemID] ON [Purchasing].[PurchaseOrderLines] 
REBUILD PARTITION = ALL 
WITH (PAD_INDEX = OFF, STATISTICS_NORECOMPUTE = OFF, SORT_IN_TEMPDB = OFF, 
RESUMABLE = OFF, ONLINE = OFF, ALLOW_ROW_LOCKS = ON, ALLOW_PAGE_LOCKS = ON)

Print '--- END Encrypted DB ---'

SET STATISTICS TIME OFF;

You can see the relevant execution results:


The encrypted database took around 24% more time (on average for all the operations) to complete.


Update Statistics


Now we execute update statistics with full scan on various tables with the following T-SQL:

SET STATISTICS TIME ON;

USE [WideWorldImporters]
GO

Print '--- Normal DB ---'

UPDATE STATISTICS [Warehouse].[StockItemTransactions] 
WITH FULLSCAN

UPDATE STATISTICS [Sales].[OrderLines] 
WITH FULLSCAN

UPDATE STATISTICS [Warehouse].[StockItems] 
WITH FULLSCAN

UPDATE STATISTICS [Application].[People] 
WITH FULLSCAN

UPDATE STATISTICS [Purchasing].[PurchaseOrderLines] 
WITH FULLSCAN

Print '--- END Normal DB ---'

USE [WideWorldImporters_encrypted]
GO

Print '--- Encrypted DB ---'

UPDATE STATISTICS [Warehouse].[StockItemTransactions] 
WITH FULLSCAN

UPDATE STATISTICS [Sales].[OrderLines] 
WITH FULLSCAN

UPDATE STATISTICS [Warehouse].[StockItems] 
WITH FULLSCAN

UPDATE STATISTICS [Application].[People] 
WITH FULLSCAN

UPDATE STATISTICS [Purchasing].[PurchaseOrderLines] 
WITH FULLSCAN

Print '--- END Encrypted DB ---'

SET STATISTICS TIME OFF;

And these are the results:


Even when some of the tables took less time, on average the encrypted database took around 15% more time to complete the statistics update. This should be other to have into account to check for your own database.


For this post we will not test any DML or SELECT statement, but you are free to do your own tests and determine if TDE implementation suits for you.

As we stated earlier, we have demonstrated that additional workload is put on TDE enabled databases in order to support the encrypt/decrypt operations. Now is is your turn to perform your own validations to see how much is impacted your own databases with this, since this can vary on different storage types (for example on fast SSD storages, it could be barely noticed).

Match the Model to the Task, Not the App: An Orchestrator-Worker Pattern in Python

Most apps that call an LLM send every request to the same model. That works until the bill arrives. A classification job that returns o...